Introduction
In some applications, it is important to How to Interfacing TSL2591 Ambient Light Level Sensor with Arduino. For example, our smartphones automatically adjust their display brightness according to the lighting conditions around us. Another example is that for better growth, plants require a certain amount of light for photosynthesis. Light sensors can be used to monitor light levels in greenhouses and indoor gardens to ensure that plants receive optimal light levels.
An ambient light sensor is a device that detects the amount of light in the environment and provides an output that corresponds to the light level. Ambient light sensors are used in a variety of applications, including smart homes, lighting control systems, agriculture, and display brightness control.
One commonly used integrated ambient light sensor is the TSL2591 sensor from ams-OSRAM USA INC. It uses a combination of photodiodes and signal processing circuitry to provide accurate and reliable light level measurements. The TSL2591 ambient light sensor can be easily interfaced with an Arduino board or any other microcontroller.
Hardware Required
Features of the TSL2591 Sensor:
- High Sensitivity: The sensor exhibits high sensitivity to 188µLux.
- Dynamic Range: With a dynamic range of 600M:1, the sensor can accurately detect light levels ranging from 188 µlux to 88,000 lux, ensuring precise measurements in diverse lighting conditions.
- Integrated ADC: Equipped with two integrated ADCs, the sensor converts analog photodiode currents into a digital output, providing a representation of the measured irradiance on each channel.
- I2C Interface: The TSL2591 sensor utilizes an I2C interface for communication with the master device, facilitating easy interaction with microcontrollers and electronic development boards like Arduino.
- Programmable Interrupt Function: The interrupt pin can be programmed to alert the microcontroller when light levels surpass a specified threshold.
- Wide Temperature Range: The sensor operates effectively in a broad temperature range, from -30 to 70 °C.
TSL2591 Module Pinout:
The TSL2591 module typically features the following pinout, as indicated on the module PCB:
- VIN: Provides power to the module.
- GND: Connected to the ground.
- 3VO: Outputs 3.3V from the module’s built-in voltage regulator, capable of sourcing up to 100mA.
- INT: Optional interrupt pin signaling the microcontroller when light levels exceed a set threshold.
- SDA: I2C serial data line for transmitting data between the TSL2591 module and the microcontroller.
- SCL: I2C serial clock line for synchronizing data transfer between the TSL2591 module and the microcontroller.
Note: Pinout details may vary slightly among different TSL2591 module manufacturers, necessitating a review of the module’s datasheet or documentation to confirm the pinout before connecting it to an Arduino board or other microcontroller.
Interfacing the TSL2591 Sensor with Arduino
This Arduino tutorial will guide you through the process of How to Interfacing TSL2591 Ambient Light Level Sensor with Arduino. The tutorial will demonstrate how to print the light intensity (in lux) on a 1602 LCD screen and send the data to the Arduino IDE Serial Monitor tool.
Circuit Diagram
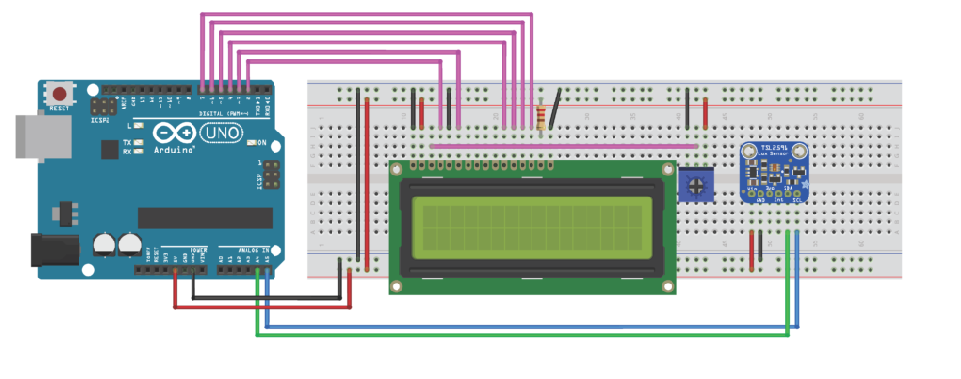
Step 1: Connect the Hardware
First, ensure that your Arduino board is powered off. Connect the TSL2591 sensor to the Arduino board as follows:
- VIN pin of the TSL2591 module is connected to 5V pin of the Arduino board.
- GND pin of the TSL2591 module is connected to GND pin of the Arduino board.
- SDA pin of the TSL2591 module is connected to A4 pin of the Arduino board.
- SCL pin of the TSL2591 module is connected to A5 pin of the Arduino board.
- Note that A4 & A5 pins of the Arduino board are hardware Two-Wire Interface (TWI) pins of the board microcontroller (ATmega328P) .
Additionally, connect the 1602 LCD screen, 10k potentiometer, and 220-ohm resistor to the Arduino board according to the circuit diagram provided in the tutorial.
Step 2: Install the Required Libraries
Before uploading the code to the Arduino board, you need to install the required libraries. Open the Arduino IDE and go to Sketch > Include Library > Manage Libraries. Search for “Adafruit TSL2591” and click the “Install” button to install the library.
Step 3: Upload the Code
Now, open the Arduino IDE and copy the code provided in the tutorial. Upload the code to the Arduino board.
Step 4: Test the Setup
Once the code is uploaded, open the Serial Monitor tool in the Arduino IDE. You should see the light intensity (in lux) being printed on the 1602 LCD screen and displayed in the Serial Monitor.
Code
#include <LiquidCrystal.h>       // Include Arduino LCD library
#include <Wire.h>                // Include Arduino wire library (required for any I2C device)
#include <Adafruit_Sensor.h>     // Include Adafruit Unified Sensor Driver
#include "Adafruit_TSL2591.h"    // Include Adafruit TSL2591 library

// LCD module connections (RS, E, D4, D5, D6, D7)
LiquidCrystal lcd(2, 3, 4, 5, 6, 7);

Adafruit_TSL2591 tsl = Adafruit_TSL2591(2591); // pass in a number for the sensor identifier (for your use later)

// Arduino setup function
void setup(void)
{
  Serial.begin(9600);   // Initialize serial communication with 9600 baud

  lcd.begin(16, 2);     // Set up the LCD's number of columns and rows
  lcd.setCursor(0, 0);  // Move cursor to column 0, row 0 [position (0, 0)]

  if (tsl.begin())
  {
    Serial.println(F("Found a TSL2591 sensor"));
    lcd.print("Light Level =");
  }
  else
  {
    Serial.println(F("Sensor Not Found ... check wiring!"));
    lcd.print("Sensor Not Found");
    while (1);   // stay here!
  }

  // Configure the gain and integration time for the TSL2591
  tsl.setGain(TSL2591_GAIN_MED);                 // Set sensor gain to 25x
  tsl.setTiming(TSL2591_INTEGRATIONTIME_300MS);  // Set sensor integration time to 300 ms

}

// Arduino main loop function
void loop(void)
{

  uint32_t tsl2591_data = tsl.getFullLuminosity();   // Get CH0 & CH1 data from the sensor (two 16-bit registers)

  uint16_t ir, ir_visible;
  ir = tsl2591_data >> 16;              // extract infrared value
  ir_visible = tsl2591_data & 0xFFFF;   // extract visible + infrared value

  float lux = tsl.calculateLux(ir_visible, ir);   // Calculate light lux value

  // Print light lux on the LCD
  lcd.setCursor(0, 1);  // move cursor to column 0, row 1 [position (0, 1)]
  lcd.print(lux, 6);
  lcd.print( " Lux  " );

  // Print light lux on serial monitor
  Serial.print(F("Light Level = "));
  Serial.print(lux, 6);
  Serial.println( " Lux" );

  delay(500);   // wait half a second

}

// end of code.
Applications of Ambient Light Sensors
Ambient light sensors have a wide range of applications. Here are five examples:
- Smart Homes: Ambient light sensors are used in smart homes to automatically adjust the lighting according to the natural light available, providing energy efficiency and convenience.
- Lighting Control Systems: Ambient light sensors are used in lighting control systems to adjust the brightness of artificial lighting based on the natural light available, ensuring optimal lighting conditions.
- Agriculture: Ambient light sensors are used in greenhouses and indoor gardens to monitor light levels and ensure that plants receive the right amount of light for photosynthesis and growth.
- Display Brightness Control: Ambient light sensors are used in devices such as smartphones, tablets, and laptops to automatically adjust the display brightness according to the surrounding lighting conditions, providing optimal viewing experiences.
- Security Systems: Ambient light sensors are used in security systems to detect changes in light levels, which can be an indication of someone entering or leaving a premises.
These are just a few examples of the many applications of ambient light sensors. The TSL2591 sensor, with its accurate and reliable light level measurements, can be a valuable component in various projects and systems.