
Introduction
Arduino LED Blink is a fundamental project for beginners in the world of Arduino programming. In this project, we’ll guide you Arduino LED Blink: A Beginner’s Guide through setting up the necessary hardware and writing a simple program to make an LED blink using an Arduino UNO board.
What is Arduino LED Blink?
Arduino LED Blink is a basic project that demonstrates how to control an LED (Light Emitting Diode) using an Arduino microcontroller. It involves turning the LED on and off at specific intervals, creating a blinking effect.
Hardware Required
How it Works
To make an Arduino LED Blink: A Beginner’s Guide, we connect the LED to a digital pin on the Arduino board. We set the pin as an output and then alternate the pin’s voltage between HIGH and LOW states to turn the LED on and off, creating a blinking pattern.
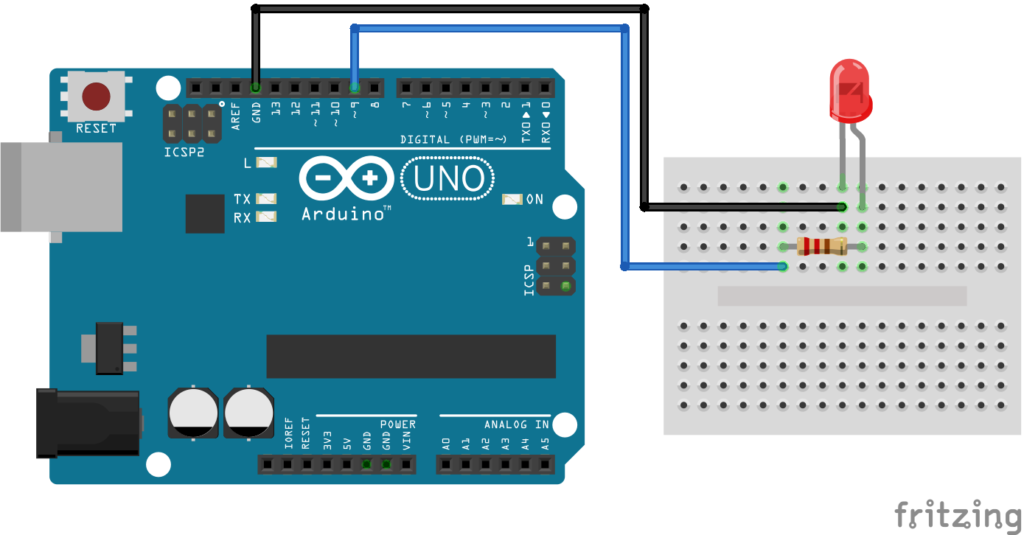
Circuit Diagram
Features of Arduino LED Blink
- Simple and Beginner-Friendly: Ideal for those new to Arduino programming.
- Minimal Hardware Requirements: Requires only a few basic components like an Arduino UNO, LED, resistor, and breadboard.
- Customizable Blinking Speed: Adjust the delay to control the blinking speed of the LED.
- Public Domain Code: The example code provided is available in the public domain, encouraging learning and sharing.
- Versatile Learning Tool: Serves as a foundation for more complex Arduino projects involving LEDs and other components.
- Engaging Tutorial: Follow a step-by-step tutorial at Arduino LED Blink Tutorial for a comprehensive guide.
Pinout
| Pin Name | Pin Description |
|---|---|
| Cathode(-) pin: | needs to be connected to GND (0V) |
| Anode(+) pin: | is used to control LED’s state |
How to Program
To program the Arduino for LED blinking, follow these steps:
- Set up the Arduino UNO and connect the components as per the hardware requirements.
- Open the Arduino IDE on your computer.
- Copy and paste the provided code into the IDE.
- Upload the code to the Arduino UNO board.
- Observe the LED connected to pin 9 blinking on and off at the specified intervals.
Code
// the setup function runs once when you press reset or power the board
void setup() {
  // initialize digital pin LED_BUILTIN as an output.
  pinMode(LED_BUILTIN, OUTPUT);
}

// the loop function runs over and over again forever
void loop() {
  digitalWrite(LED_BUILTIN, HIGH);  // turn the LED on (HIGH is the voltage level)
  delay(1000);                      // wait for a second
  digitalWrite(LED_BUILTIN, LOW);   // turn the LED off by making the voltage LOW
  delay(1000);                      // wait for a second
}
Application of Arduino LED Blink
- Prototyping: Basic blinking functionality to test and prototype circuit connections.
- Visual Indicator: Create a visual indicator for various Arduino-based projects.
- Traffic Signal Simulation: Simulate a traffic signal using multiple LEDs with varying blink patterns.
- Low-Power Devices: Implement blinking to indicate low battery or power-saving mode in devices.
- Alert Systems: Build alert systems using LEDs for notifications or warnings.
- Interactive Art: Incorporate LED blinking patterns in interactive art installations.