
Introduction
Arduino RGB LED Projects open a world of colorful possibilities for creators of all skill levels. These projects leverage RGB (Red, Green, Blue) LEDs to produce stunning lighting effects and dynamic displays. Whether you’re a beginner or an experienced maker, these projects offer a canvas for creative expression and technical exploration.
Hardware Required
What is Arduino RGB LED Projects?
Arduino RGB LED Projects comprise a versatile collection of endeavors that revolve around RGB LEDs. They enable you to control the brightness and color of these LEDs, allowing for an array of lighting effects, color blending, and interactive installations. From mood-enhancing lighting to interactive art pieces, these projects provide a platform to experiment with RGB LEDs in innovative ways, fostering creativity and technical innovation.
How It Works
Arduino RGB LED Projects involve the control of RGB LEDs, which consist of three individual LEDs (red, green, and blue) within a single package. By manipulating the intensity of each color channel, you can achieve a wide range of colors. The provided code example showcases a basic method to cycle through three different colors with specific RGB values. By adjusting these values, you can create your custom colors and animations.
Features of Arduino RGB LED Projects
- Versatile Color Control: Create a spectrum of colors and dynamic lighting effects.
- Educational: Ideal for learning about RGB LEDs, programming, and electronics.
- Customizable Animations: Craft unique color transitions and lighting patterns.
- Low-Cost Components: Affordable hardware for experimenting and prototyping.
- Endless Creativity: Use RGB LEDs in art installations, mood lighting, and interactive displays.
- Open-Source Community: Access to a wealth of resources and project ideas from the Arduino community.
Circuit Diagram
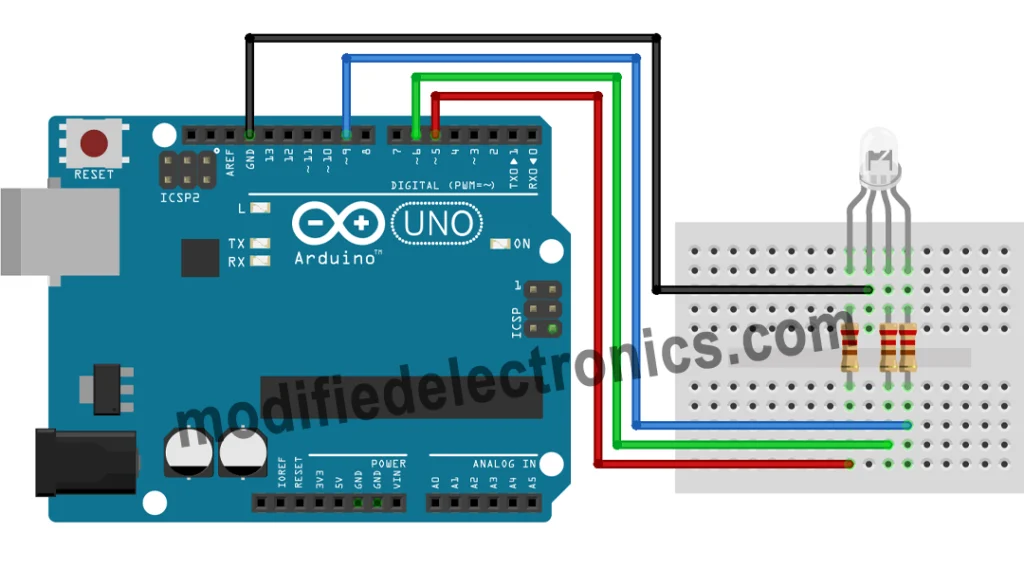
Pinout of RGB LED
| Pin Name | Pin Description |
|---|---|
| PIN_RED | Output pin for controlling the red channel |
| PIN_GREEN | Output pin for controlling the green channel |
| PIN_BLUE | Output pin for controlling the blue channel |
How to Program
The provided code is a simple example of cycling through RGB colors. By changing the values of PIN_RED, PIN_GREEN, and PIN_BLUE, you can achieve different colors. Experiment with the code to create custom lighting patterns and animations.
Code
const int PIN_RED   = 5;
const int PIN_GREEN = 6;
const int PIN_BLUE  = 9;

void setup() {
  pinMode(PIN_RED,   OUTPUT);
  pinMode(PIN_GREEN, OUTPUT);
  pinMode(PIN_BLUE,  OUTPUT);
}

void loop() {
  // color code #00C9CC (R = 0,   G = 201, B = 204)
  analogWrite(PIN_RED,   0);
  analogWrite(PIN_GREEN, 201);
  analogWrite(PIN_BLUE,  204);

  delay(1000); // keep the color 1 second

  // color code #F7788A (R = 247, G = 120, B = 138)
  analogWrite(PIN_RED,   247);
  analogWrite(PIN_GREEN, 120);
  analogWrite(PIN_BLUE,  138);

  delay(1000); // keep the color 1 second

  // color code #34A853 (R = 52,  G = 168, B = 83)
  analogWrite(PIN_RED,   52);
  analogWrite(PIN_GREEN, 168);
  analogWrite(PIN_BLUE,  83);

  delay(1000); // keep the color 1 second
}
Application of Arduino RGB LED Projects
- Mood Lighting: Enhance the ambiance of your space with dynamic color changes.
- Art Installations: Create interactive and visually appealing art pieces.
- Notification Systems: Use RGB LEDs for visual notifications or alerts.
- Prototyping: Ideal for experimenting with lighting in electronic prototypes.
- Educational Projects: Teach color mixing and electronics concepts.
- Entertainment Displays: Build colorful displays for events and entertainment.