Introduction
Arduino – LED – Fade – Tutorial is an intriguing project that demonstrates how to control the brightness of an LED, creating a gradual and smooth transition between light and dark. This effect, often referred to as LED fading, can be used in various applications, including mood lighting, visual effects, and more.
Hardware Required
What is Arduino – LED – Fade?
Arduino – LED – Fade – Tutorial is a project that showcases the capability of Arduino to control the intensity of an LED’s illumination smoothly. Instead of simply turning the LED on and off, this project allows you to achieve a gradual and aesthetically pleasing transition between different brightness levels.
How it Works
The LED fading effect is achieved through Pulse Width Modulation (PWM). PWM allows us to control the average voltage delivered to the LED by rapidly turning it on and off. By varying the duty cycle (the time the LED is on versus off), we can create the illusion of varying brightness levels. This code gradually increases and decreases the LED’s brightness in a loop, resulting in the fading effect.
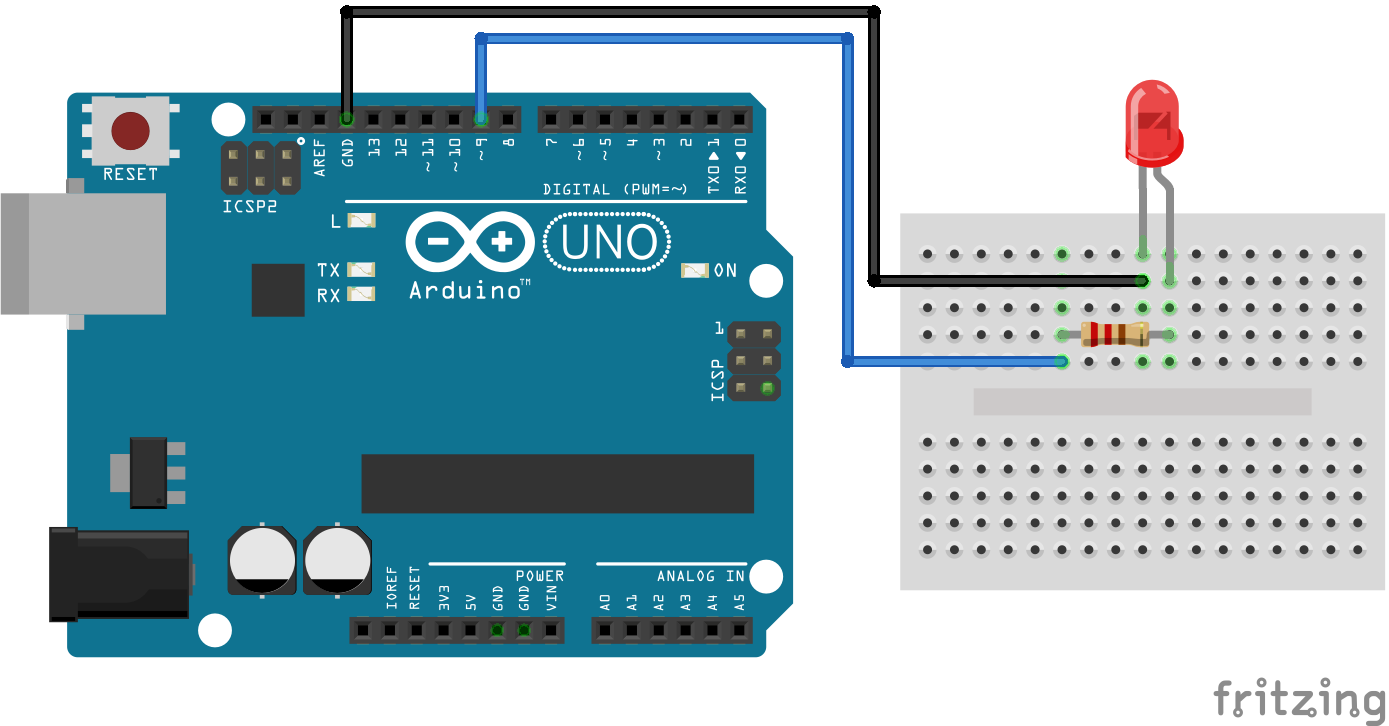
Circuit Diagram

Features of Arduino LED Fade
- Smooth Transition: Achieve graceful and gradual light intensity transitions.
- Customizable Fading Speed: Adjust the speed at which the LED fades in and out.
- Public Domain Code: The example code provided is available in the public domain, fostering learning and adaptation.
- Creative Lighting Effects: Ideal for creating ambiance or visual effects in various projects.
- Efficient Power Management: Enables energy-efficient illumination control.
- Simple Hardware Setup: Requires minimal components, making it accessible for beginners.
Code
#define LED_PIN 9  // the Arduino PWM pin connected to the LED

int brightness = 0;  // how bright the LED is
int fadeAmount = 5;  // how many points to fade the LED by

// the setup routine runs once when you press reset:
void setup() {
  // declare pin 9 to be an output:
  pinMode(LED_PIN, OUTPUT);
}

// the loop routine runs over and over again forever:
void loop() {
  // set the brightness of pin 9:
  analogWrite(LED_PIN, brightness);

  // change the brightness for next time through the loop:
  brightness = brightness + fadeAmount;

  // reverse the direction of the fading at the ends of the fade:
  if (brightness <= 0 || brightness >= 255) {
    fadeAmount = -fadeAmount;
  }
  // wait for 30 milliseconds to see the dimming effect
  delay(30);
}
How to Program
- Set up the Arduino UNO and connect the components according to the hardware requirements.
- Open the Arduino IDE on your computer.
- Copy and paste the provided code into the IDE.
- Upload the code to the Arduino UNO board.
- Observe the LED connected to pin 9 smoothly fading in and out, creating a captivating effect.
Application of Arduino LED Fade
- Mood Lighting: Create soothing or dynamic lighting effects for room ambiance.
- Visual Displays: Implement in visual displays, art installations, or interactive exhibits.
- Dimmable Indicator Lights: Use for status or feedback indicators with adjustable brightness.
- Fade-In/Fade-Out Alerts: Employ in notification systems for subtle alerts.
- Energy-Efficient Lighting: Control LED brightness in low-power applications to save energy.
- Simulation and Prototyping: Simulate natural light changes in prototypes or models.