Introduction
In this Arduino tutorial, we will explore how to Button Toggle Led Code|Arduino Tutorial each time a button is pressed. This engaging project demonstrates the interplay between digital inputs, outputs, and the physical world. With an Arduino UNO, a button, an LED, and a few basic components, you’ll master the art of toggling an LED with a simple press.
Hardware Required
How It Works
The heart of this project is the push button and the LED. When the button is press, it establishes an electrical connection between its two terminals. This connection is detected by the Arduino, which reads the button’s state as LOW. When the button is not pressed, the Arduino reads the state as HIGH.
The Arduino uses this information to toggle the state of the LED. When the button is press (transition from HIGH to LOW), the Arduino inverts the LED’s state. If the LED was off, it turns it on, and if it was on, it turns it off. This creates a simple toggle effect that mirrors the button’s state.
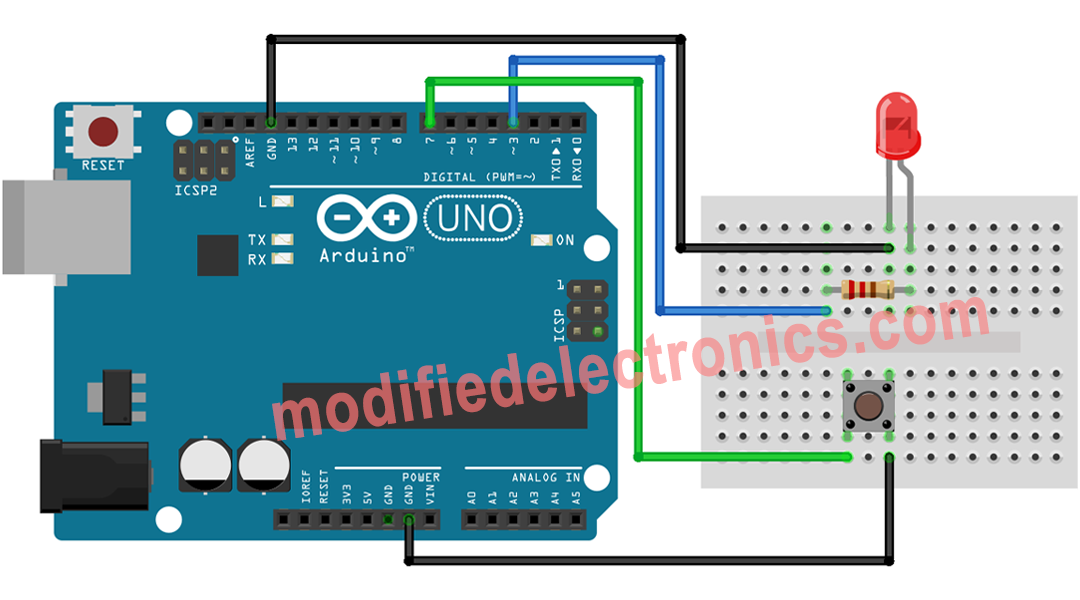
Circuit Diagram

Code
This code for Button Toggle Led Code|Arduino Tutorial Without Debouncing
// constants won't change
const int BUTTON_PIN = 7; // Arduino pin connected to button's pin
const int LED_PIN    = 3; // Arduino pin connected to LED's pin

// variables will change:
int ledState = LOW;     // the current state of LED
int lastButtonState;    // the previous state of button
int currentButtonState; // the current state of button

void setup() {
  Serial.begin(9600);                // initialize serial
  pinMode(BUTTON_PIN, INPUT_PULLUP); // set arduino pin to input pull-up mode
  pinMode(LED_PIN, OUTPUT);          // set arduino pin to output mode

  currentButtonState = digitalRead(BUTTON_PIN);
}

void loop() {
  lastButtonState    = currentButtonState;      // save the last state
  currentButtonState = digitalRead(BUTTON_PIN); // read new state

  if(lastButtonState == HIGH && currentButtonState == LOW) {
    Serial.println("The button is pressed");

    // toggle state of LED
    ledState = !ledState;

    // control LED arccoding to the toggled state
    digitalWrite(LED_PIN, ledState);
  }
}
Code -2
This code for Button Toggle Led Code|Arduino Tutorial With Debouncing
#include <ezButton.h>

/// constants won't change
const int BUTTON_PIN = 7; // the number of the pushbutton pin
const int LED_PIN    = 3; // the number of the LED pin

ezButton button(BUTTON_PIN);  // create ezButton object that attach to pin 7;

// variables will change:
int ledState = LOW;   // the current state of LED

void setup() {
  Serial.begin(9600);         // initialize serial
  pinMode(LED_PIN, OUTPUT);   // set arduino pin to output mode
  button.setDebounceTime(50); // set debounce time to 50 milliseconds
}

void loop() {
  button.loop(); // MUST call the loop() function first

  if(button.isPressed()) {
    Serial.println("The button is pressed");

    // toggle state of LED
    ledState = !ledState;

    // control LED arccoding to the toggleed sate
    digitalWrite(LED_PIN, ledState);
  }
}
Application
- Learning: Ideal for beginners to understand digital input and output.
- User Interfaces: Learn how to use buttons for user interactions in your projects.
- Prototyping: Incorporate button-based controls in your prototypes.
- Custom Control Systems: Build systems that respond to button inputs.
- Games and Gadgets: Create interactive games or gadgets with toggling features.