Introduction
In this tutorial, we will learn how to fade an LED using a potentiometer with an Arduino board. The potentiometer will act as a variable resistor, allowing us to control the brightness of the LED. We will be using the Arduino Uno board, a potentiometer, an LED, a resistor, a breadboard, and jumper wires for the How to Potentiometer Fade LED|Arduino Tutorial project.
Hardware Required
Step-by-Step Guide
Follow these steps to fade an LED using a potentiometer with Arduino:
Step 1: Connect the Components
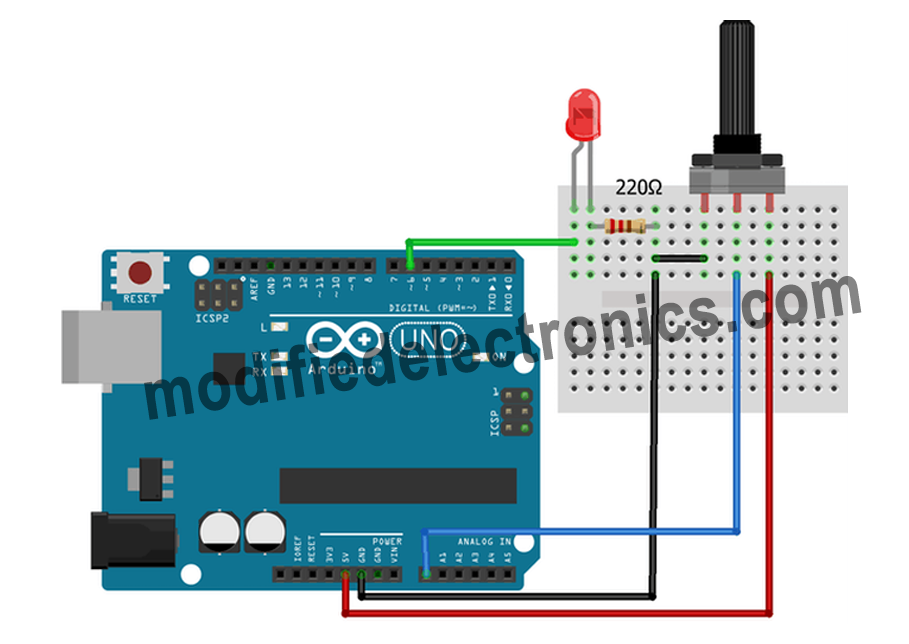
Start by connecting the components as follows: – Connect the positive leg of the LED to digital pin 3 on the Arduino board. – Connect the negative leg of the LED to the 220 ohm resistor. – Connect the other end of the resistor to the ground (GND) pin on the Arduino board. – Connect one end of the potentiometer to the 5V pin on the Arduino board. – Connect the other end of the potentiometer to the ground (GND) pin on the Arduino board. – Connect the middle pin of the potentiometer to analog pin A0 on the Arduino board.
Step 2: Upload the Code
Copy the code provided above and open the Arduino IDE. Paste the code into a new sketch and click the Upload button to upload the code to the Arduino board.
Step 3: Open the Serial Monitor
After uploading the code, open the Serial Monitor by clicking on the magnifying glass icon on the top right corner of the Arduino IDE. Set the baud rate to 9600.
Step 4: Rotate the Potentiometer
Now, rotate the potentiometer and observe the changes in the brightness of the LED. As you turn the potentiometer, the analog value read from pin A0 will change, and the brightness of the LED will correspondingly change.
Step 5: View the Results
You can also view the analog value and brightness level on the Serial Monitor. The code provided includes a serial print statement that displays the analog value and brightness level. This can be useful for debugging and understanding the relationship between the potentiometer position and LED brightness.
Circuit Diagram
Code
This code for How to Potentiometer Fade LED|Arduino Tutorial
int LED_PIN = 3;  // the PWM pin the LED is attached to

// the setup routine runs once when you press reset:
void setup() {
  // initialize serial communication at 9600 bits per second:
  Serial.begin(9600);

  // declare LED pin to be an output:
  pinMode(LED_PIN, OUTPUT);
}

// the loop routine runs over and over again forever:
void loop() {
  // reads the input on analog pin A0 (value between 0 and 1023)
  int analogValue = analogRead(A0);

  // scales it to brightness (value between 0 and 255)
  int brightness = map(analogValue, 0, 1023, 0, 255);

  // sets the brightness LED that connects to  pin 3
  analogWrite(LED_PIN, brightness);

  // print out the value
  Serial.print("Analog: ");
  Serial.print(analogValue);
  Serial.print(", Brightness: ");
  Serial.println(brightness);
  delay(100);
}
Explanation of the Code
The code provided uses the analogRead() function to read the analog value from pin A0, which is connecte to the potentiometer. This value is then mapped to a brightness level using the map() function. The brightness level is then set using the analogWrite() function on pin 3, which is connected to the LED. The code also includes a delay of 100 milliseconds to slow down the fading effect. You can adjust this delay to change the speed of the fade.
Conclusion
By following this tutorial, you have learned how to fade an LED using a potentiometer with Arduino. This simple project demonstrates the use of analog input and PWM (Pulse Width Modulation) output to control the brightness of an LED. Experiment with different potentiometer positions and observe the changes in LED brightness. This knowledge can be applied to various projects where variable brightness control is required.