Introduction
In this Arduino tutorial, we will learn How to Potentiometer Triggers LED | Arduino Tutorial. Potentiometers are variable resistors that can be used to control the flow of current in a circuit. By connecting a potentiometer to an Arduino board, we can adjust the resistance and use it as an input to control other components, such as an LED.
Hardware Required
Quick Steps
Follow these steps to set up the circuit and upload the code to your Arduino board:
- Connect the Arduino board to your PC using the USB cable.
- Open the Arduino IDE and select the appropriate board and port.
- Copy the provided code and open it in the Arduino IDE.
- Click the “Upload” button on the Arduino IDE to upload the code to the Arduino board.
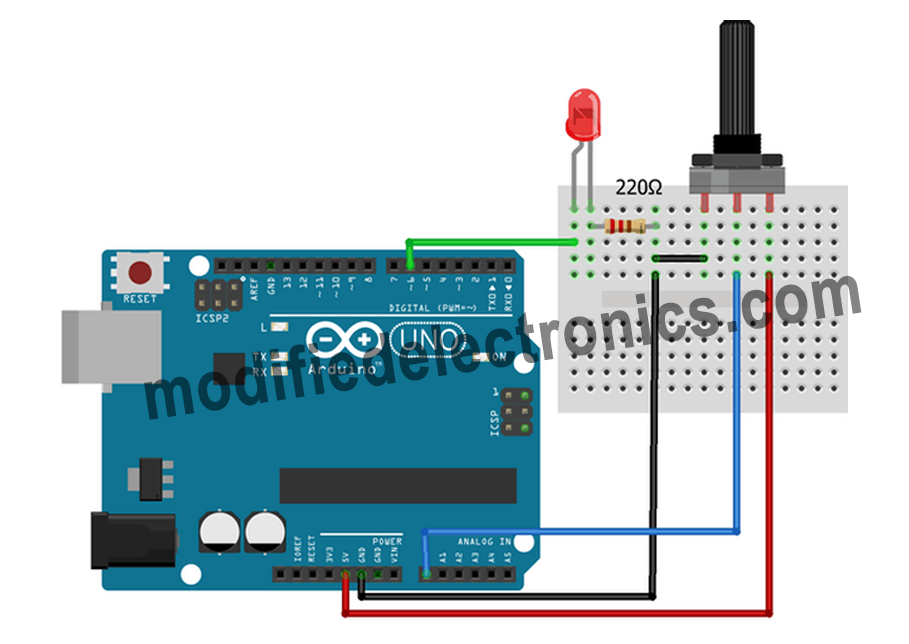
Circuit Diagram
Code
Analog Threshold for How to Potentiometer Triggers LED | Arduino Tutorial
// constants won't change
const int POTENTIOMETER_PIN = A0; // Arduino pin connected to Potentiometer pin
const int LED_PIN           = 3;  // Arduino pin connected to LED's pin
const int ANALOG_THRESHOLD  = 500;

void setup() {
  pinMode(LED_PIN, OUTPUT); // set arduino pin to output mode
}

void loop() {
  int analogValue = analogRead(POTENTIOMETER_PIN); // read the input on analog pin

  if(analogValue > ANALOG_THRESHOLD)
    digitalWrite(LED_PIN, HIGH); // turn on LED
  else
    digitalWrite(LED_PIN, LOW);  // turn off LED
}
Code – 2
Potentiometer’s analog value is converted to voltage value, and then compared to voltage threshold to triggers LED
// constants won't change
const int POTENTIOMETER_PIN   = A0; // Arduino pin connected to Potentiometer pin
const int LED_PIN             = 3; // Arduino pin connected to LED's pin
const float VOLTAGE_THRESHOLD = 2.5; // Voltages

void setup() {
  pinMode(LED_PIN, OUTPUT); // set arduino pin to output mode
}

void loop() {
  int analogValue = analogRead(POTENTIOMETER_PIN);      // read the input on analog pin
  float voltage = floatMap(analogValue, 0, 1023, 0, 5); // Rescale to potentiometer's voltage

  if(voltage > VOLTAGE_THRESHOLD)
    digitalWrite(LED_PIN, HIGH); // turn on LED
  else
    digitalWrite(LED_PIN, LOW);  // turn off LED
}

float floatMap(float x, float in_min, float in_max, float out_min, float out_max) {
  return (x - in_min) * (out_max - out_min) / (in_max - in_min) + out_min;
}
Explanation of the Code
The code provided uses the analogRead() function to read the analog value from pin A0, which is connecte to the potentiometer. This value is then mapped to a brightness level using the map() function. The brightness level is then set using the analogWrite() function on pin 3, which is connected to the LED. The code also includes a delay of 100 milliseconds to slow down the fading effect. You can adjust this delay to change the speed of the fade.
Applications
This Arduino tutorial can be applied in various projects where you need to control an LED based on the input from a potentiometer. Some possible applications include:
- Dimming or brightening an LED based on the potentiometer’s position.
- Creating a volume control for a sound system.
- Controlling the speed of a motor based on the potentiometer’s position.
- Building a light-sensitive system that automatically adjusts the LED brightness.
That’s it! You have successfully learned how to use a potentiometer to trigger an LED using an Arduino board. Have fun exploring further possibilities with this versatile component!
Conclusion
By following this tutorial, you have learned how to fade an LED using a potentiometer with Arduino. This simple project demonstrates the use of analog input and PWM (Pulse Width Modulation) output to control the brightness of an LED. Experiment with different potentiometer positions and observe the changes in LED brightness. This knowledge can be applied to various projects where variable brightness control is required.